The Parging Concrete Guide
The most common areas that may require concrete parging are masonry chimneys or building walls (particularly aged ones that are demonstrating brick deterioration in some volume), concrete block foundation walls, and surfaces which have previously had cement parging installed.
When undertaking such work, the key is proper preparation of the surfaces to be parged with concrete. Step one is to consider the integrity of the structure. If for instance you are dealing with an older brick chimney that someone parged over once upon a time; you will need to check that the underlying bricks which form the structure of the chimney are in sufficient condition to accept the new concrete parging.
An acceptable surface will be one where the bricks and interlaced mortar joints between the brick courses are intact. If there is evidence of loose bricks or missing mortar; such areas must be corrected by sawing out and replacing individually damaged bricks, and then properly pointing any void mortar with new mortar pack.
If the greatest majority of the brick work is deficient; you are better served to simply tear down the chimney and rebuild it with new bricks.
Assuming that the underlying bricks are in good shape; the first process is removing any shaled or old parging (using a coal chisel and mallet are best; and always wear proper eye protection).
Once the surface is void of the old parging cement, using a wire brush; scrape the surface liberally to remove old dust and grit, then power wash the surface to provide a clean substrate for the new application.
In some instances, application of a ½” galvanized wire mesh is preferred to create a sub-surface for which new parging cement will be inclined to stick. It can also provide rigidity particularly in climates which experience shifts in temperature from hot to cold. In all instances of brick or block construction; a coat of liquid concrete bonding agent should be applied to the original surface before parging with concrete begins. The underlying surface should be clean and dampened with water (not saturated), then one can roll or brush on the bonding agent.
Apply the parging cement in an upward sweeping motion; effectively transferring the cement from the hawk using a wide steel trowel. The motion involves pushing in, upward, and swiping off in a fluid motion.
This process is repeated, working from the bottom up on the wall surface. Application of the initial coat should be a minmum of a half an inch thick. More may be required to account for irregularities in the sub- surface for which the cement parging is being applied.
Soak a board or (2”x4”), to use as a corner form, so that when applying the cement parging,one is left with a crisp straight corner appearance. Allow the work surface to dry sufficiently before removing the corner form board. Then one can repeat the process on the opposing wall surface.
While a master mason makes the job look easy; practice is a requisite for the amateur who tries to simultaneously hold a cement laden hawk in one hand and a wide trowel in the other, while concentrating on the task at hand.
The initial application of cement parging is referred to as the “scratch coat”. In some instances the mason can complete only one coat, applied in a dense fashion, and smoothed to a completed finish. In other circumstances; the initial scratch coat may be applied using a notched trowel, with the intention that a secondary application of cement parging will be completed to supply the finished result.
It is important to cover the newly completed parging to protect from rain , and to allow sufficient curing of the concrete. Depending on the outdoor temperature, it will depend on how long it will take for the parging to cure; however an average of one week is typical, and perhaps longer in high humidity or damper climates.
Where cement parging is being applied to a bare wood substrate, such as an exterior house wall; it is imperative to have an appropriate moisture barrier (such as Blueskin™) membrane applied in a water-shedding method, before applying the galvanized mesh layer. Alternatives include using a breathable exterior house wrap product, and application of extruded styrene insulation which can act to provide thermal value. It is important to seek the advice of an expert, building engineer, or architect who can properly assess the particular structural elements and supply a correct specification for the circumstances.
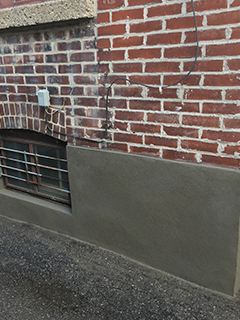
If applying cement parging to a block wall, the same preparation and installation methodology should be applied as in the chimney example noted earlier. With the exception that one will not require installation of an underlying mesh material, as the parging cement will naturally bond well to concrete blocks. Where exposed block foundation wall areas are concerned (above grade); apply more like ¾” of cement parging in order that once the application has dried, no “shadow” of the underlying mortar joints will show through the finished application.
There are commercially available ready-made parging cement mixes available at masonry suppliers and building supply stores, but professional masons will likely prefer to mix their own parging cement mixtures. This is preferred to account for variations in substrate and weather circumstances.
A typical cement parging mixture should be the consistency of peanut butter when being applied. The mixture should never be too runny. Essentially two parts of brick sand mixed with one part Portland cement is the correct ratio. To the dry mix, one adds water in a gradient fashion until the correct consistency has been achieved.
When undertaking large areas, it is best to have one apprentice batching the cement parging mixture to supply the mason applying the parging. This provides for consistency in application because the mason wants to maintain a rhythm of application for finished appearance sake.
Periodically the mason may sprinkle water using a brush over the applied parging in order that he/she can re-float over the applied parging, and provide a smoother, more refined finished appearance.
Once the parged surface has cured ; an application of good quality exterior acrylic paint can be applied to proved further weather protection, and to blend parged areas with existing finishes. While painting is not absolutely necessary, it does provide for a beautifully finished appearance.
When completing any cement parging work it is important to insure no water can penetrate behind the finish. Moisture which can leak behind the parging surface, or get wicked up from the ground, will serve to damage the finished result, so it is necessary to insure that proper flashings be used to shed water away at transition or elevation changes, around window or door openings, and where protrusions or openings may exist in the wall surface. Such examples can include exterior outlets, lights,water pipes ,gas lines and dyer vents.
When water-proofing foundations below grade; in many instances it is a good idea to apply new cement parging over an older block foundation wall, as it will help fill tiny voids and cracks in the original materials, and will provide a clean new surface for water-proofing membranes and coatings to be applied. The process will take longer due to curing time requirements and will cost more; but can result in a longer lasting water-proofing job.
To learn more about cement parging, waterproofing or other masonry work involving bricks, block or stone, visit www.avenueroadmasonry.com or see us on YouTube™, or you can also visit us on Facebook™.